Summer Refresh: Updated Classrooms and Learning Spaces

The Houston H. Harte Center for Teaching and Learning, Leyburn Library (Level 1)

Video Recording Studio 101
Lighting control wall mounted touch panel, 8 light panels, 4 motorized backdrop screens, and sound proofing wall panels.

Special Collections Classroom 102
Laser projector, tensioned screen, ceiling microphones and speakers, lectern with HDMI and USB-C connectivity, touch panel, monitor, Blu-ray player, document camera, Solstice Pod, front and rear cameras for videoconferencing and lecture capture.

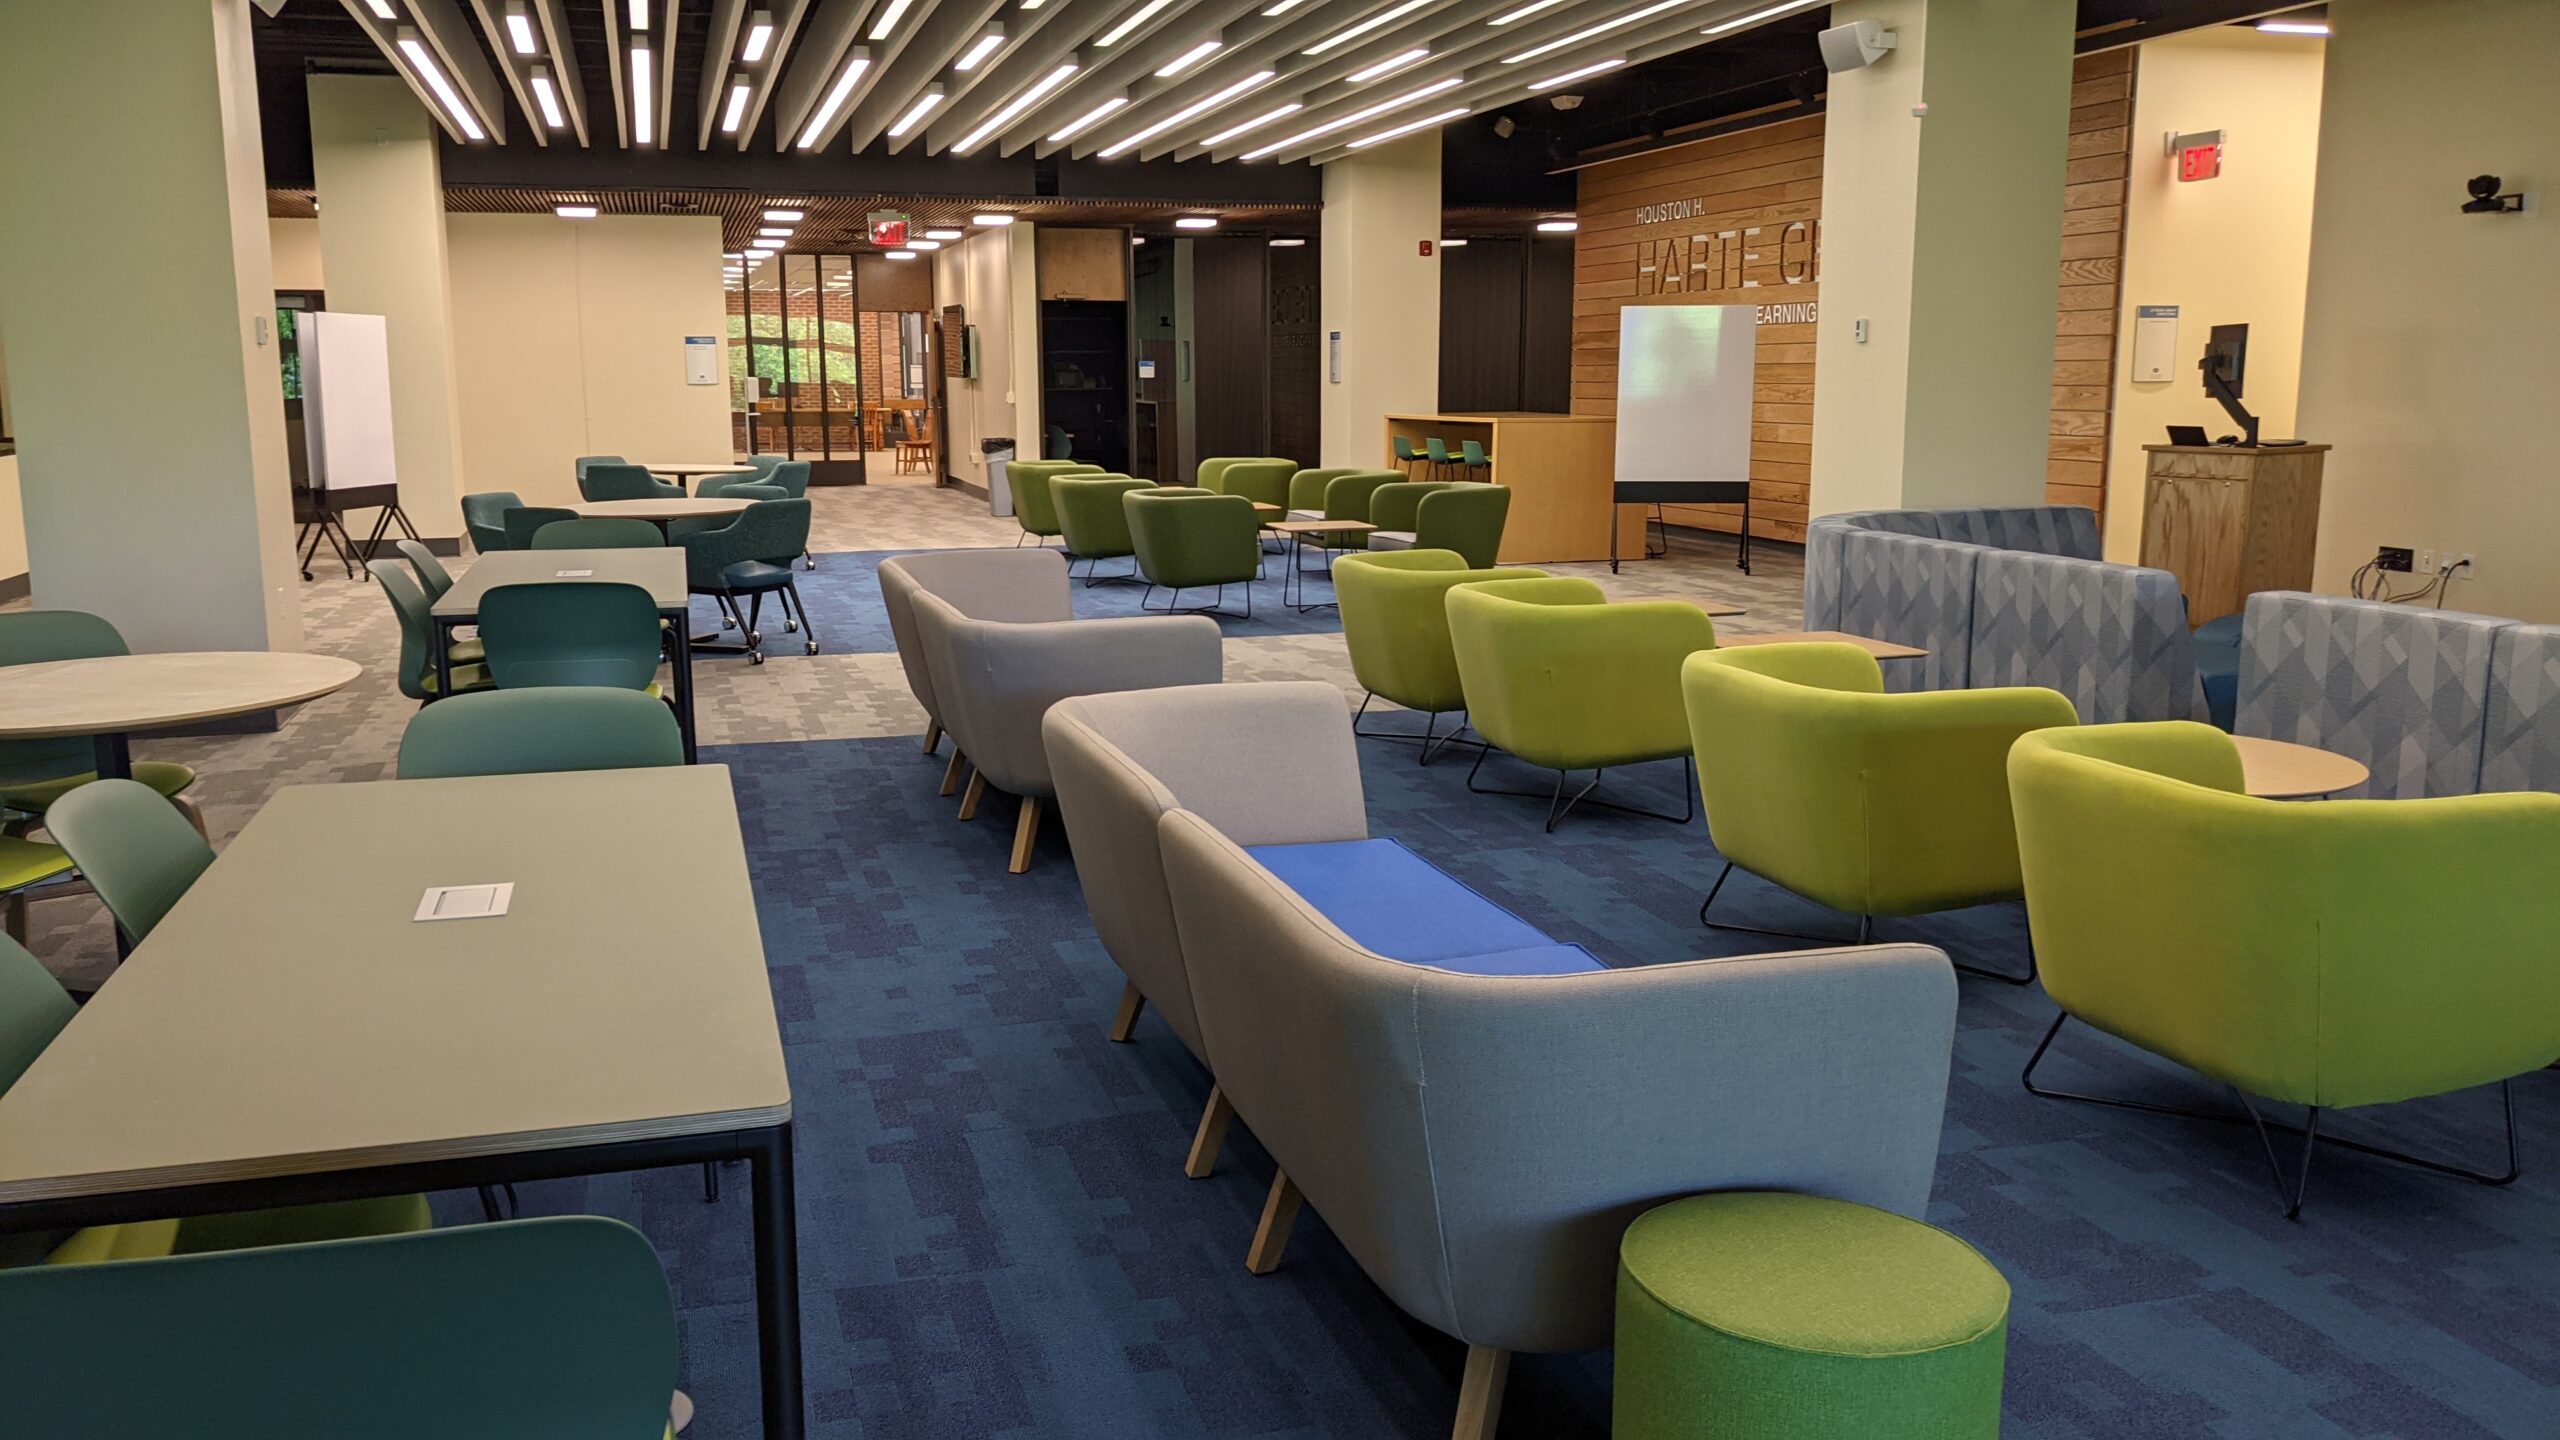
Innovation Classroom (Leyburn 109)
Interactive projector, whiteboard, 2 sidewall flat panel displays, ceiling microphones and speakers, lectern with HDMI and USB-C connectivity, touch panel, monitor, Blu-ray player, document camera, 3 Solstice Pods, front and rear cameras for videoconferencing and lecture capture.

Teaching Hub (Leyburn 119)
Laser projector, tensioned screen, 2 sidewall flat panel displays, ceiling microphones and speakers, lectern with HDMI and USB-C connectivity, touch panel, monitor, Blu-ray player, document camera, Solstice Pod, front and rear cameras for videoconferencing and lecture capture.

Peer Tutoring Rooms (Leyburn 121 and 122)
60” flat panel display, video conference sound bar, AV cabinet with HDMI and USB-C connectivity, wall mounted touch panel, and Solstice Pod.

Video Editing Suites (Leyburn 123, 124, and 125)
Studio vocal microphones on boom arm and sound proofing wall panels.

Collaboration Gallery (Leyburn 128)
Laser projector, tensioned screen, ceiling microphones and speakers, lectern with HDMI and USB-C connectivity, touch panel, monitor, Blu-ray player, Solstice Pod, front and rear cameras for videoconferencing and lecture capture.

Oral Presentation Rooms (Leyburn 130 and 140)
 60” flat panel display, video sound bar, AV cabinet with HDMI and USB-C connectivity, microphone, camera for lecture capture, wall mounted touch panel, and Solstice Pod.

Digital Signage
New RISE displays across from the elevators.

Leyburn 222 and 223
Two new University classrooms! Laser projector, tensioned screen, ceiling microphones and speakers, lectern with HDMI and USB-C connectivity, touch panel, monitor, Blu-ray player, document camera, Solstice Pod, front and rear cameras for videoconferencing and lecture capture.

Elsewhere on Campus

Science Addition AG14, 114, and 214
Laser projector, tensioned screen, ceiling microphones and speakers, lectern with HDMI and USB-C connectivity, touch panel, monitor, Blu-ray player, document camera, Solstice Pod, and rear cameras for lecture capture.

Wilson Hall 2018
2 laser projectors, 2 tensioned screens, ceiling microphones and speakers, lectern with HDMI and USB-C connectivity, touch panel, monitor, Blu-ray player, document camera, Solstice Pod, and rear cameras for lecture capture.

COMING Fall 2021

Leyburn 301
Laser projector, pull screen, wall mounted touch panel, Blu-ray player, new Apple computers, and new furniture.


NEW! Comment Library in Canvas Speedgrader! Reuse Frequently Used Comments in Speedgrader!

We KNOW you love Speedgrader to annotate student submissions, leave personalized feedback and enter grades—all in one! And we also know you wish there was a  way to add and save comments for reuse whilst grading.

Well, now there is! Instructure has been listening to your feedback and has introduced a new feature: the Comment Library.

The Comment Library allows you to save frequently used comments in SpeedGrader and be reused across multiple students and assignments. Comments you have added to the Comment Library are accessible from each course in which you are enrolled as an instructor. Comments can be edited in and deleted from the library at any time.

comment-library-1.png
Open the Comment Library


comment-library-2-add-to-library.png
Add a comment to Comment Library

Comments can be added directly from the Comment Library by opening the library and clicking the comment that should be added. The library will close and the comment will display in SpeedGrader.

comment-library-3-select-comment.png
Add a comment via the Comment Library

Notes: 

  • Comments are saved per user regardless of course, so comments that you save in one course will also display when viewing SpeedGrader in another course.
  • The Comment Library functionality is not supported in the assignment submission details page.

Have questions? Need help? Contact the ITS Information Desk at 540.458.4357 (HELP) or send an email help@wlu.edu.

The Houston H. Harte Center for Teaching and Learning is now OPEN!

Looking for Academic Technologies or Harte Center staff? We’ve moved!

You can now find us —

  • Senior Academic Technologist Brandon Bucy
  • Associate Director of Assessment Kristy Crickenberger; 
  • Director of the Harte Center Paul Hanstedt;
  • Director of Academic Technologies Julie Knudson;
  • Director of Fellowships Matthew Loar;
  • Academic Technologist Helen MacDermott, and
  • Harte Center Administrative Assistant Brittany Wright

— on the 1st floor of Leyburn Library.

You will ALSO find lots of new, comfortable, and inviting spaces to read, work, or meet with colleagues! And whiteboards galore! 😍😍😍

Please come by to say hello! We’re also reflecting upon and recovering from this past academic year, and preparing to support W&L faculty and staff for a hopefully LESS stressful and chaotic Fall Term.

Celebrate Global Accessibility Awareness Day!

The tenth annual Global Accessibility Awareness Day (GAAD) is this Thursday, May 20th.

GAAD was launched to highlight the need for increased digital accessibility by getting people talking, thinking, and learning about digital access and inclusion for all and, more importantly, people with different abilities and talents.clip art of a blind man with a cane, woman with a hearing aid, a wheelchair user, a woman with a prosthetic limb, an older person, and a man with a limb difference, all standing together

Approximately 15 percent of the world’s population have a disability, according to the World Health Organization, which means that more than one billion people could face daily challenges when using digital devices. 

What is Accessibility?

Accessibility is the ability of a website/mobile app/electronic document to be easily navigated and understood by the widest range of users possible, including people with visual, auditory, speech, motor, neurological or cognitive disabilities.

Note that accessibility is not a discrete feature of a website, tool, or app. It’s an on-going aspect of a managed process made up of many intentional design and development decisions, based on real-world practice, institutional policy, public standards, and awareness of the diversity of user experiences.

Why Accessibility Matters

The World Wide Web is an increasingly important resource in many aspects of life: government information and services, education and training, commerce, news, workplace interaction, civic participation, health care, recreation, entertainment, and more. In some cases, the Web is replacing traditional resources.

Therefore, it is essential that the Web be accessible in order to provide equal access and equal opportunity to people with diverse abilities.


Link to Web accessibility – What does it all mean? (.docx, 17 MB) transcript.

Web accessibility is about eliminating barriers that prevent access to information and functionalities on websites.

How to Participate in GAAD 2021

Want to Present at Fall Academy?

The 2021 Fall Academy will take place from Monday, August 23 to Friday, September 3. We are now accepting your proposals!

If you would like to offer a session, please let us know the following information:

  1. Title
  2. Description
  3. Presenter(s)
  4. Duration
  5. Preferred date(s) and times – we’ll try to accommodate, but some sessions that are already booked might prevent this.

Questions? Contact Julie Knudson (jmknudson@wlu.edu, x8125) or Helen MacDermott (hmacdermott@wlu.edu, x4561).

Thank you!

On #Ungrading, by Mikki Brock

What an honest, eye-opening, and marvelous summary of how Dr. Mikki Brock, Associate Professor of History, incorporated ungrading this past term!

I want to share some reflections on my first semester of #ungrading, which I did in my 100-level survey & 300-level seminar. This will be a long thread, but the TLDR is that I think it went really well. I loved it, the majority of my students loved it, & we all learned a lot. 1/ 

First, though, let me acknowledge that it is easier for me to do this type of experimentation than others because of my own privilege: tenured, white, a “known quantity” to my students, and supported by a dept. chair & cohort of colleagues testing the waters with me. 2/ 

My own positionality matters, and we need to keep pushing for *all* faculty to have these opportunities. 3/ 

So: the vast majority of my students reported that they enjoyed ungrading. Yes, some felt anxious about it, but most said it freed them to take risks, to think deeply about their learning, and to pay attention to my feedback rather than simply glance at a number on a page. 4/ 

Many also noted that it reduced their stress and left them more empowered and engaged than they expected. Others also said that ungrading made them want to work more, not less, because they were motivated by curiosity and commitment to the class—things beyond just pleasing me. 5/ 

A few did say they preferred traditional grading (interestingly, all men), but they also said they understood *why* I chose to ungrade. Even if they didn’t love the system, I think moving forward they’ll have a more expansive view of what learning is, and what it is for. 6/ 

I think there are some things I did well this term. Above all, I kept things simple and transparent. Lots of check ins and no mystery. Individual assignments included short self-assessments, and I also did longer, more general ones at midterm and finals. 7/ 

I cannot stress enough what a joy these self-assessments were to read. They were, for the most part, honest, vulnerable, and insightful. Above all, they provided an important opportunity for feedback and dialogue beyond just commenting on their work itself. 8/ 

There are some things I’d do differently. Next time, I’ll hold more required student conferences. I’ll try to be a bit more precise in sharing with students *my* objectives for the class, rather than just asking for theirs. 9/ 

I gave them even more feedback on their work than I usually would, but I probably could have made this feedback structured in a way that made it clearer for them and less time consuming for me. This is perhaps the one downside to ungrading: it is actually more work! 10/ 

In the end, students graded themselves, because my institution requires grades. As someone who tends to like lots of control and oversight, this was actually a really big step for me, and I am proud that I took it. 11/ 

One of the things that put me at ease was that I set a “floor”: students had to complete all assignments *according to the directions* in order to earn a B- or above. Most of my students did so, and I did not feel the need to change any of the grades students gave themselves. 12/ 

The final grade distribution was similar to previous terms, if maybe a smidge higher, which I attribute to the fact that I assigned a bit less work than usual (pandemic!). Plus students just did a really great job, esp. given all the things they were grappling with this term. 13/ 

For anyone curious about ungrading, I have a four suggestions for getting started. First, read @SusanDebraBlum‘s Ungrading and @Jessifer‘s blog; these were essential in giving me the confidence (and practical advice!) to do this. 14/ 

Their work also afforded me the language to explain to my students *why* I was doing things this way. And I did a lot of explaining, because I think students deserve to understand my approach to their learning, even if a few ultimately remain unconvinced. 15/ 

Second, I recommend starting small. In fall, I did only participation; students assessed this part of their grades based on their preparation + engagement. This was low stakes & helped me understand the process. There are also other ways to ungrade. It isn’t all or nothing! 16/ 

Third, try ungrading in a senior-level class first, as upperclass-folks tend to be more confident, they often know you, and these courses are generally smaller. My jrs and srs seemed to really like & appreciate the ungraded approach. I was surprised by how onboard they were! 17/ 

Last, if you are able, find like-minded colleagues who want to go on this journey with you. Meet regularly and talk about anxieties, aims, and strategies. We were also very lucky to have @curriculargeek provide us with constant encouragement and practical help. Thanks, Paul! 18/ 

In sum, I’ll continue to improve my own process, but I doubt I’ll ever return to the traditional system, because I just don’t believe in it. Ungrading was more work, but it was also more joyful. It put trust & curiosity at the center of my classroom. 10/10 would recommend. /fin 

Want to hear more from Dr. Brock and other W&L professors who adopted ungrading? Look for the Ungrading panel session at Fall Academy, which will be August 23 – September 3, 2021.

Shiny New Canvas Features: Webcam Assignment Submissions and Assignment Reassignment!

NEW! In File Upload assignments, students can use their webcam to submit to an assignment. This change allows students to use their webcam to submit a file upload assignment from the browser and aligns behavior with the Canvas Student app.

How This Feature Works for Students

For File Upload assignments, students have the option to use their webcam for file uploads. The first time they use the feature, they will need to give permission to Canvas to access their computer webcam. Like all other graded submission types, images submitted via the webcam functionality do not count against course or user quota.

erinhallmark_0-1614036096378.png

How This Feature Works for Instructors

Instructors can view uploaded images submitted via a student’s webcam as they see other file uploads in SpeedGrader and anywhere that submissions are available. 


NEW! In SpeedGrader, instructors can leave feedback comments and reassign the assignment to a student. This feature allows an instructor to ask a student to resubmit an assignment as part of the instructor’s regular grading workflow.

How This Feature Works for Instructors

For online assignments with a due date, instructors can view a Reassign button in SpeedGrader. If they require a student to redo an assignment, they can reassign the assignment directly to the student from within their grading workflow in SpeedGrader.

The instructor must first provide feedback regarding the assignment, which will enable the button. The reassignment does not change the original due date for the student.

Notes

  • The Reassign Assignment button is not available for External Tools (LTI), on paper, and no submission assignments.
  • The Reassign Assignment button is only available for assignments with due dates.
  • If an instructor returns to SpeedGrader after navigating away from the page, the Reassign Assignment button shows that the assignment has been reassigned.
  • If the assignment’s settings do not allow students to make an additional attempt, the Reassign Assignment shows that the assignment is not able to be reassigned.

erinhallmark_1-1614036208084.png

How This Feature Works for Students

When an assignment is reassigned, students see the assignment in their List View Dashboard with the instructor’s feedback.

Students can resubmit the assignment and submit for additional feedback from their instructor.

Wall Street Journal: How to Teach Professors Humility? Hand Them a Rubik’s Cube

Sandy Roberson sent a note to professors at Furman University and Denison University in mid-December with a simple message.
 
“Failure is not an option,” she wrote on a discussion board frequented by a few dozen other academics.
 
Three weeks later, the veteran Furman accounting professor reconsidered and abandoned her assignment. She had been bested by a Rubik’s cube.
 
Ms. Roberson was among roughly 30 faculty members from the two schools who had signed on to a winter-break challenge: learn to solve the cube-shaped puzzle in five minutes or less, within six weeks. And, in the process, learn to become better instructors by being reminded what it’s like to be a novice.
 
“After you do something for a very long time, it just becomes second nature,” said Lew Ludwig. The math professor at Denison, in Granville, Ohio, runs the school’s Center for Learning and Teaching and coordinated the challenge with a counterpart at Furman, in Greenville, S.C. The schools are members of an organization for faculty development at small colleges. “The brain does not like new stuff,” he said. “Learning is hard.”
 
Amen to that!  Read the rest of this article by Melissa Korn.
 
Thanks to Senior Academic Technologist Brandon Bucy for sharing this great article AND these thoughts:
 
“I’ve always thought the expert-novice divide is one of the hardest things to get around when teaching.  We honestly forget how much we struggled in the past with a concept before mastering it, and can’t relate to our struggling students or really help them in a meaningful way except to encourage them to continue the struggle.  I think in a way it represents the internally chaotic nature of learning, that “learning” itself is somehow non-rememberable once you get through it.”
 

Digital Exit Tickets

What’s an Exit Ticket?

pink exit ticketAn exit ticket is simply a question posed to all students at the end of class/the week/unit of study.

Student responses provide you with immediate insight that you can use to assess students’ understanding, monitor their questions, or gather feedback on your teaching and, if necessary, adjust or adapt your instructional strategies.

In  Art and Science of Teaching/The Many Uses of Exit Slips, Robert J. Marzano suggests 4 different types of prompts for exit tickets:
 

Provide formative assessment data:

    • What was the big idea of today’s lesson?
    • What was the most important thing you learned in today’s class? Why is it important?
    • What is the most difficult question you have about what you learned today?
    • How could the knowledge you learned today be used in the real world?
    • What’s one thing you want to practice again?
    • What are you struggling to understand at the moment?

Stimulate student reflection/analysis:

    • What could you have done today to help yourself learn better?
    • What part of the lesson surprised you?
    • Which part of today’s lesson was most interesting?
    • I used to think but now I know…
    • What is something you weren’t sure about at the start of class but understand now?
    • Imagine a friend missed class today. How would you explain what we covered in 25 words or less?
    • If you were creating a quiz about today’s class, what are two questions you’d include?
    • How can you apply something you learned today to another class or subject?
    • How can you apply what you learned today to your own life?

Focus on instructional strategies:

    • How did the group work today help you understand the content? What are some things you’d like to see during group work in the future?
    • We did a concept map activity in class today. Was this a useful learning activity for you? Why or why not?
    • Did you value the group activity today? Do you think the activity or task would have been better done alone?
    • Which of the readings was most helpful in preparing you for class? Why?

Offer open communications:

    • What could I do differently to help you understand better
    • What is one thing you’d like me to explain more clearly?
    • What’s one change we could make to the way we learn in this class?
    • What’s one thing you’d like me to START doing in class?
    • What’s one thing you’d like me to STOP doing in class?
    • What’s one thing you’d like me to CONTINUE doing in class?

Ideally, exit tickets are no more than one or two short, open-ended (when possible) questions that take students less than 5 minutes to complete. 

Tools you can use to implement exit tickets

Microsoft Forms

 
Microsoft Forms example of an exit ticket form
Click this image to view this one question Exit Ticket form

Poll Everywhere

Poll Everywhere one question exit ticket survey

3 question Exit Ticket survey in Poll Everywhere

Need a Poll Everywhere account? Email the ITS Information Desk at help@wlu.edu or call 540.458.4357 (HELP).

Polling for Zoom meetings

  1. Enable Polls in Zoom
  2. Create a Poll
  3. Launch a Poll

Anonymous Ungraded Survey in Canvas

Exit Ticket survey in Canvas


Flipgrid

My Ah-ha Moment! Flipgrid exit ticket
Click to view this Flipgrid exit ticket!

Do you use exit tickets in your class? Have they been helpful? If you have any thoughts to share, we’d love to hear ’em!

Enable Real-Time Transcriptioning in Your Zoom Meetings!

Did you know that you can add closed captioning or transcriptioning to a Zoom meeting?

Zoom provides free, AI-powered live transcription. Transcription is the process in which speech or audio is converted into a written, plain text document. 

Live transcription only supports English and you must you speak clearly for best results. Unfortunately, live transcription is NOT supported in breakout rooms.

NOTE: The accuracy of Zoom’s live transcription feature depends on many variables, such as, but not limited to:

  • Background noise
  • Volume and clarity of the speaker’s voice
  • Speaker’s proficiency with the English language
  • Lexicons and dialects specific to a geography or community

OK, here’s how!

Before your Zoom meeting:

  1. Sign in to the Zoom web portal with your W&L credentials.
  2. In the navigation panel, click Settings.
  3. Click the Meeting tab.
  4. Scroll down to Closed captioning.
  5. Click the toggle to enable it. If a verification dialog displays, click Turn On to verify the change.
    Enabling Closed Caption in Zoom settings
  6. With Closed Captioning enabled, the option to enable live transcription should appear directly below as Enable live transcription service to show transcript on the side panel in-meeting. Check this to enable live transcription.
  7. Click the toggle for Save Captions if you want to enable the ability for meeting participants to save closed captions or transcripts.

During your Zoom meeting:

  1. In a Zoom meeting you are hosting, click the Live Transcript button: Zoom meeting tools with Live Transcript button highlighted
  2. Click on Enable Auto-Transcription: options for Live Transcript in Zoom
    You also have the option to assign a participant to type, manually type closed captions yourself, or copy the URL that you’d provide to a third-party closed captioning service.

As a Zoom Meeting Participant

  1. When enabled by the host, you will see a notification above Live Transcript in the meeting controls, informing you that the service is available.
  2. Click Live Transcript, and then select Show Subtitle. The provided subtitles can be clicked and dragged to move their position in the meeting window.

To adjust the caption size:

  1. Click the up ^ next to Start Video / Stop Video
  2. Click Video Settings then Accessibility.
  3. Move the slider to adjust the caption size. 

See Zoom’s guide to closed captioning and live transcription for more information!

Need help? Have questions? Contact the ITS Information Desk at 540.458.4357 (HELP) or email help@wlu.edu

P.S. You can also enable live captions in a Teams meeting, too!