New Zoom YuJa Connector Makes Saving and Sharing your Zoom Recordings Easier!

YuJa and Zoom company logos being added together
 

ITS has just implemented a connector linking our Zoom web conferencing tool with our video capture and media management system, YuJa. Moving forward, all recordings made in Zoom will automatically import into your personal media space within YuJa for storage and sharing.

What does this mean for you? First off, you are no longer limited by the 30-day retention policy for recordings within Zoom. You can feel confident that any recordings made during Zoom meetings will automatically and seamlessly transfer to YuJa for permanent storage and retrieval. In addition, you can take advantage of many features within YuJa to autocaption, edit, clip, and share recordings with individual students, classes, external colleagues, or to the public. If you use the Zoom tool within Canvas to schedule your class Zoom sessions, resulting recordings will even automatically publish to your course channel, making them immediately accessible to your students from within Canvas. 

You can access your imported recordings by navigating to YuJa from your MyApps page or by clicking the YuJa link in any of your Canvas courses. Once in YuJa, look for a folder in your personal media area titled “Zoom Recordings”.

Questions? Want to know more? Contact Brandon Bucy or drop by my office in the Harte Center (Room 117, Lower Level 1 in Leyburn Library).

Have you updated Zoom lately?

modal dialog box in Zoom indicating an update is available

No? You haven’t? Please do! You do NOT want to miss out on some new features!

(Don’t know how to update Zoom? Here’s how to download the newest Zoom changes.)

Zoom has completely redesigned their virtual whiteboard experience to boost asynchronous collaboration.

Zoom meeting attendees can collaborate by adding, dragging, and dropping images, sticky notes, messages, and more and use shapes and connectors for diagramming purposes. You can easily share online whiteboards with other Zoom users using the share sheet AND access your whiteboards anytime, during or outside a meeting – they are saved automatically!

Zoom’s new whiteboard functionality is available on your Zoom client for desktop and web browser.

Zoom Whiteboard

To get started with Zoom Whiteboard, you’ll need Zoom version 5.10.3 or later. Here’s how you can create, access, and share your digital whiteboards:

  1. Sign into your Zoom account using the Zoom client on your device or web browser.
  2. Select the Whiteboards tab, and choose New Whiteboard to start a whiteboard. 
  3. To view your whiteboards, select the ‘My Whiteboards’ tab. You can also select ‘Shared with Me’ to view whiteboards that have been shared with you. 
  4. To share a digital whiteboard you’ve created, open the whiteboard you wish to share, select the Share button, and type the contact or email you wish to share the board with. 

*Pro tip: Be sure to visit Zoom’s support page to learn more about Zoom Whiteboard and its features! 

Questions? Need help? Contact the ITS Information Desk at 540.458.4357 (HELP) or help@wlu.edu.

How to Create Classroom Recordings of Lectures

Pick YuJa or Zoom, whichever video conferencing tool you are more comfortable with using. Both will work.

I pick YuJa!

YuJa Method #1: I want to record my class to YuJa and make it available to my students in Canvas.

  1. Enable YuJa in your Canvas course.
  2. Record class in an YuJa-enabled classroom and save directly to your course channel
  3. Tell students to click on YuJa in the course navigation of your Canvas course to watch videos published to the course channel.

YuJa Method #2: I want to edit my YuJa class recording before I make it available to my students in Canvas.

  1. Enable YuJa in your Canvas course.
  2. Record class in an YuJa-enabled classroom
  3. Use the Video Editor to make simple edits. (optional)
  4. Publish to your course channel.
  5. Tell students to click on YuJa in the course navigation of your Canvas course to watch videos published to the course channel.

I pick Zoom!

  1. Enable YuJa in your Canvas course.
  2. Create and start a Zoom meeting. (Read this if you’ve enabled Zoom in your Canvas course.)
  3. Record the Zoom meeting to the cloud.
  4. Download the Zoom cloud recording and upload to your YuJa course channel.
  5. Tell students to click on YuJa in the course navigation of your Canvas course to watch videos published to the course channel.

Need help? Have questions? Contact the ITS Information Desk at help@wlu.edu, 540.458.4357 (HELP), or stop by the Main Level of Leyburn Library. We’ve got you.

How to Share Your Pronouns on Zoom

3x3 grid of various faces representing different ethnicities, ages, and genders, with different preferred pronouns

Have you updated your Zoom client lately? No? You should!

Why?

Wither version 5.7.0, Zoom has added new options for sharing your personal pronouns.

This new feature adds a dedicated text field on the profile page where you can type in your preferred pronouns and a drop-down menu with sharing controls for your pronouns:  always share, never share, or have Zoom ask before every meeting if pronouns should be displayed.

Pronouns will appear in parentheses next to people’s names in Zoom meetings and will also be visible under people’s names on their profile cards in the Zoom desktop client and mobile app.

screenshot of Zoom to show where pronouns will appear

“In introducing the Pronouns feature, we hope this will help everyone feel better able to express themselves and respectfully address others, which ultimately leads to a stronger culture of connectivity and an improved communications experience,” Zoom wrote in its announcement.

Check out Adding and sharing your pronouns in the Zoom Help Center to get started. But first, you’ll want to update your Zoom to version 5.7.0!

Have questions? Need assistance? We got you! Contact the ITS Information Desk at 540.458.4357 (HELP) or email help@wlu.edu.

Enable Real-Time Transcriptioning in Your Zoom Meetings!

Did you know that you can add closed captioning or transcriptioning to a Zoom meeting?

Zoom provides free, AI-powered live transcription. Transcription is the process in which speech or audio is converted into a written, plain text document. 

Live transcription only supports English and you must you speak clearly for best results. Unfortunately, live transcription is NOT supported in breakout rooms.

NOTE: The accuracy of Zoom’s live transcription feature depends on many variables, such as, but not limited to:

  • Background noise
  • Volume and clarity of the speaker’s voice
  • Speaker’s proficiency with the English language
  • Lexicons and dialects specific to a geography or community

OK, here’s how!

Before your Zoom meeting:

  1. Sign in to the Zoom web portal with your W&L credentials.
  2. In the navigation panel, click Settings.
  3. Click the Meeting tab.
  4. Scroll down to Closed captioning.
  5. Click the toggle to enable it. If a verification dialog displays, click Turn On to verify the change.
    Enabling Closed Caption in Zoom settings
  6. With Closed Captioning enabled, the option to enable live transcription should appear directly below as Enable live transcription service to show transcript on the side panel in-meeting. Check this to enable live transcription.
  7. Click the toggle for Save Captions if you want to enable the ability for meeting participants to save closed captions or transcripts.

During your Zoom meeting:

  1. In a Zoom meeting you are hosting, click the Live Transcript button: Zoom meeting tools with Live Transcript button highlighted
  2. Click on Enable Auto-Transcription: options for Live Transcript in Zoom
    You also have the option to assign a participant to type, manually type closed captions yourself, or copy the URL that you’d provide to a third-party closed captioning service.

As a Zoom Meeting Participant

  1. When enabled by the host, you will see a notification above Live Transcript in the meeting controls, informing you that the service is available.
  2. Click Live Transcript, and then select Show Subtitle. The provided subtitles can be clicked and dragged to move their position in the meeting window.

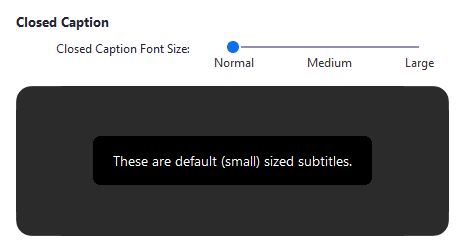
To adjust the caption size:

  1. Click the up ^ next to Start Video / Stop Video
  2. Click Video Settings then Accessibility.
  3. Move the slider to adjust the caption size. 

See Zoom’s guide to closed captioning and live transcription for more information!

Need help? Have questions? Contact the ITS Information Desk at 540.458.4357 (HELP) or email help@wlu.edu

P.S. You can also enable live captions in a Teams meeting, too!

NYTimes: I Actually Like Teaching on Zoom

Viet Thanh Nguyen is a contributing opinion writer at The New York Times and the author of “Nothing Ever Dies: Vietnam and the Memory of War.”

Nguyen is the Aerol Arnold Chair of English and Professor of English and American Studies and Ethnicity at the University of Southern California. @viet_t_nguyen


Here’s an unpopular opinion: I like teaching on Zoom.

Many accounts of teaching on Zoom or other online platforms recount its horrors. And much is horrible: teachers and students without stable internet connections or adequate technology; too much intimacy, with overcrowded homes that teachers or students might find embarrassing for others to see; and not enough intimacy, with the human connection attenuated online.

As a college professor, I, too, miss some of the elements of teaching in a classroom, including the intellectual energy that can flow around a seminar table, the performative aspect of lecturing to a large audience and the little chats that take place by happenstance during breaks or after class with students.

What I don’t miss is my 10-mile drive to campus and back. I don’t miss pondering my wardrobe choices in the morning. The relative informality of the Zoom era means that I would feel overdressed if I wore a blazer to teach. And if I don’t wear a blazer, I don’t have to wear slacks. Or put on shoes. Why would I wear shoes inside my house, anyway?

Continue reading “NYTimes: I Actually Like Teaching on Zoom”

NEW! Allow Zoom meeting participants to choose their own breakout rooms!

Self-select breakout rooms is a new Zoom feature that require both the meeting host and participants to be using Zoom 5.3.0 or later. Participants who aren’t using Zoom 5.3.0 or later will have to be manually moved to a breakout room by the meeting host.

Before scheduling your Zoom meeting, do the following:

  1. Update your Zoom client.
  2. Enable breakout rooms:

Instructions for the meeting host:

  1. After you’ve begun the Zoom meeting, click Breakout Rooms in the Zoom tool bar.
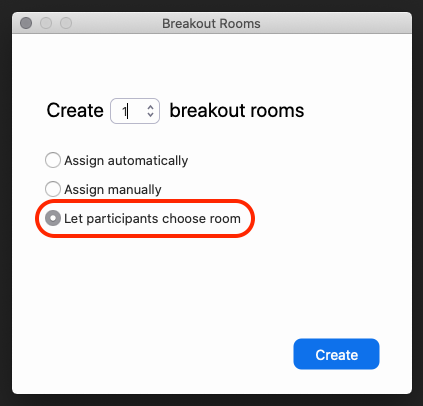
  2.  If you have the latest version of Zoom, you should see the option Let participants choose room.

Clicking on Breakout Rooms in Zoom

You can then rename the rooms (A), edit Breakout Room settings (B), add additional rooms (C), and Open all the Rooms (D).

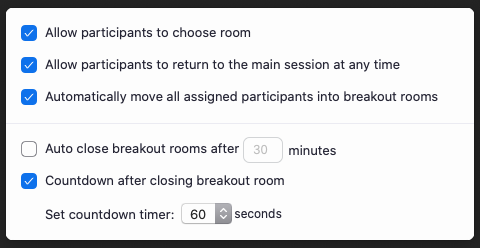
If you click on Breakout Room settings (B), you’ll see:

breakout room settings in Zoom

NOTES:

  • The Recreate button allows you to start from scratch by manually recreate the Breakout Room OR randomly recreating your Breakout Rooms and placing participants into rooms automatically.
  • If the meeting is being recorded to the cloud, it will only record the main room, regardless of what room the meeting host is in.  If local recording is being used, it will record the room the participant who is recording is in. Multiple participants can record locally.

Instructions for participants:

(https://support.zoom.us/hc/en-us/articles/115005769646-Participating-in-breakout-rooms)

Self-selecting a breakout room

If the host has allowed participants to self-select and join breakout rooms of their choosing, participants will be able to view and select from a list of breakout rooms the host has created. They will be able to enter and leave breakout rooms freely. 

Note: Participants not joined with the desktop or mobile app (version 5.3.0 or higher) will not be able to self-select a breakout room. The host will need to facilitate moving these participants manually.  

  1. Click the Breakout Rooms option in your meeting controls. This will display the list of open breakout rooms created by the host. 
  2. Click Join next to the Breakout Room you wish to participant in, then confirm by clicking Join again. 
  3. Repeat as necessary to join other breakout rooms, or click Leave Room to return to the main session. 

Need help with Zoom? Contact the ITS Information Desk at help@wlu.edu, 540.458.4357  (HELP), or stop by Leyburn Library.

How to Record a Presentation with Multiple Speakers in Zoom

Need to record a group presentation? Here are some tips to create a polished recording!

Working assumption:

  • The meeting host should think of themselves as the producer of the recording. 
  • There is one PowerPoint (.ppt file) that will shared by the meeting host.

Before you begin …

  • IMPORTANT! The meeting host and all speakers should update their Zoom client to the latest version.
  • Everyone should plan to use a headset or clip-on microphone, if possible.
    • Need to borrow a headset or clip-on microphone? Contact the ITS Information Desk at help@wlu.edu, 540.458.4357 (HELP), or stop by Leyburn Library.
    • Why? The kind of microphone you use will affect the other participants’ ability to hear you. 
  • The meeting host should check their Zoom Recording settings:
    • Enable “Cloud Recording”.
    • Enable “Record active speaker with shared screen”.
    • Enable “Record thumbnails when sharing”.
    • Enable “Optimize the recording for 3rd party video editor”.
    • Click the Save button.

Five minutes before the meeting begins ….

  • Restart your computer/laptop and close any applications you don’t need to use for the meeting itself.
    • Why? Other applications have a way of intruding and asking for attention from your CPU and broadband connection. 
  • Set up your head set or clip-on microphone.
    • Headset microphones should sit an inch or so away from your face and a few centimeters away from the corner of your lips. Clip-on microphones should sit at the upper side of the chest.

OK, it’s time!

  • The host signs into Zoom with their W&L credentials (either at wlu.zoom.us or within the Zoom client) and starts the meeting. 
  • Do an audio/video check for each speaker, i.e. make sure everyone can start/stop their camera and mute/unmute their microphone.
  • All speakers start their cameras.
  • The meeting host shares screen.
    • Share only the PowerPoint application, not the entire desktop.
  • The meeting host spotlights speaker #1.
  • All other speakers should stop their video and mute themselves.
  • The meeting host turns on “Hide non-video participants“.
  • The meeting host starts a cloud recording.
  • When the speaker #1 is finished, the speaker #2 should start video and unmute audio. Then speaker #1 stops video and mutes audio while the meeting host spotlights speaker #2.
  • Repeat for all speakers.
  • Stop the cloud recording when finished!

Don’t panic if there’s a goof or mistake! After the recording has processed so you can download it, the mp4 file can be edited in Camtasia (Windows or Mac) or QuickTime (Mac). Contact the ITS Information Desk you need access to either of those applications!

BACK BY POPULAR DEMAND! “OK Zoomer: Going Beyond the Basics (Repurposing Zoom Tools for Increased Student Engagement)”

Designed and led by Doug Shaw, Professor of Mathematics at the University of Northern Iowa, and Leigh Zeitz, Associate Professor, Instructional Technology at University of Northern Iowa, this workshop builds on techniques developed by the Applied Improvisation Network to do things with Zoom that you have NEVER seen before!

Doug will show you how to use features of Zoom in ways that they were not originally intended to be used while having a good time. You will leave with new ideas you can use right away, feeling energized, excited about using what you’ve learned, and confident in developing your own new techniques.

Faculty and staff are invited to join us on Friday, February 19, 2021 at 12 pm EST (our presenters are in the CST time zone) and learn how to make Zoom class meetings more effective and engaging.

Visit go.wlu.edu/okzoomer to register. Space is limited!

NOTE: Registration is a two part process. You will receive a link to sign up for the actual Zoom meeting AFTER signing up in Event Manager.